It doesn't take long to whiz through a pile of shirts once you get a rhythm going.
Pretty soon you have a neat and tidy pile of blocks!
As with all projects, there are always several ways to reach an end result, this just happens to be the way I break down a pile of t-shirts for a quilt.
Before you start--a very important thing to remember is that they need to be prewashed
without laundry softener or a dryer softener sheet. The softeners don't allow the iron-on stabilizer to stick well.
No wasting time with scissors, just cut a narrow strip from each side of the shirt, keeping as close to the sleeve as possible.
Then, open it up and separate the front from the back. They look terribly wrinkled, but you can smooth them out by hand right on the cutting mat.
I am not associated with this company, just a satisfied customer. This is the light weigh stabilizer I use. One bolt will make 3 lap quilts or 2 queens.
With the shirt wrong side up I pull a length of stabilizer (glue side down) over the part I plan to use.
I don't cut it off the bolt, just keep it on a stool behind my cutting table and pull it up as needed. Every time I flip the bolt over, that annoying instruction tissue just unrolls to the floor.
Making a freehand cut right at the neckline will give me the most space above the front logo.
Pick these two pieces as a unit and take to the ironing board.
Press carefully, so as not to get the interfacing stuck to your iron! Don't iron, just press all over the piece leaving a small margin at either side. I also have to turn down my iron from my usual cotton setting.
Yes, I have my iron labeled. I have 2 irons, this is the only one I ever use with "sticky stuff." That way my other iron stays clean and I know I will never have any residue on it's soleplate that can transfer a mark onto fabric.
Then, I take the fused shirt piece back to the mat. With my ruler, I try to find a straight edge print on the logo for measuring that first cut.
I always use the bottom of the words. Here, the ruler is set on the 3.5 inch line on the bottom of the phrase "if it's got."
There are always a few with the printing that is either skewed, applied crooked or simply has wonky letters. With these, you just have to split the difference. Don't be afraid to eyeball a block and trim it up if it looks really strange. See how the B on basketball is almost 1/4 inch higher than the rest of the word?
Once you have a straight cut at the top of the shirt, then you can put this straight cut on the mat at 16, 14, 12 inches, which ever measurement you want the block to be. I usually try to cut 16 inches so I can reduce it later if needed.
After you have the top and bottom cut, then measure the logo to find the horizontal center. That way, you can mark it with a pin to measure out from the center each way to cut your edges--centering the logo. The front of most girl's shirts won't give you more than 14 inches.
Sometimes there are even shirts saved from elementary school or Jr. High to mix in the quilt. I have a 16 inch square ruler, but can rarely use it, as it only works on large men's shirts.
Now, I take this block back to the ironing board and press, making sure all the edges are pressed well. Just remember that all your pressing must be done from the back of the blocks. These logos will melt in the blink of an eye! Ask me how I know . . .
Sometimes, sleeves have things on them also. I use every single little logo, number, patch, etc. Everyone loves having it ALL there on their quilt!
Here is a piece from the front, the number from the sleeve and the back of a shirt.
After I stabilized all three pieces, I sewed them together, appliqueing the number in the center. I use a regular 1/4 inch seam and press open. This block will be squared up and trimmed when I decide what size it needs to be as I start the quilt.
Here is the finished block.
This block is made up of two long sleeves, cut in 6.5 inch strips and then sewn together.
 |
| "Sprungle" pantograph by Jodi Beamish, gold thread. |
Here is another shirt back where I appliqued a couple of logos from the front and sleeve.
After stabilizing the patch, machine blanket stitch is used to applique it to the block.
When you can make them all 16 inch blocks, and have only about a dozen shirts, it makes a nice grid and I like to use cornerstones in the sashing.
This quilt was made from 9 men's shirts.
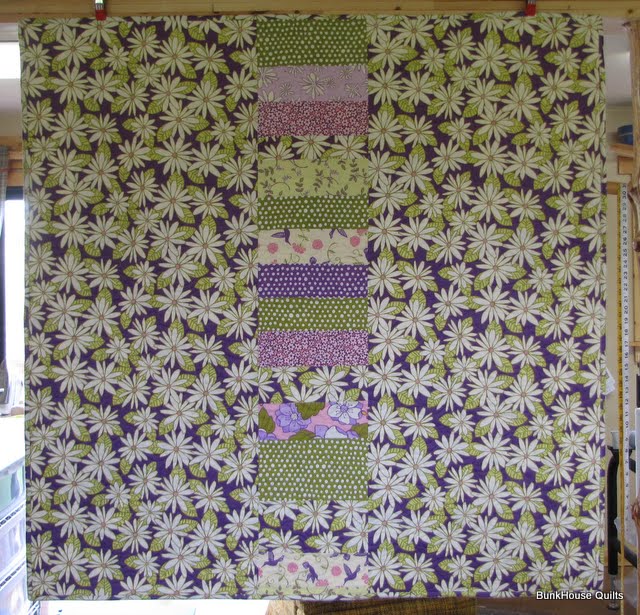
When using different size blocks, I always sew the sizes into vertical strips, as in this quilt. The first vertical strip was made of 14 inch wide blocks, the second, 12inch, the third was 16-18 inches wide.
Unlike the blue and gold quilt above, where the sashing was all one color, for this next quilt, I was inspired by a t-shirt quilt over at
Nana Girl Quilts. She used wonderful scrappy sashings to make her quilt.
Here I used all navy blue prints with gold designs. To the right, 4 small logos are pieced to make up a single block.
This is the end result, it's more of a random look. Certainly different than a 16 inch grid quilt.
I am also inspired by my little granddaughter who always tells me, "Grandma, you have to think outside the box!"