Monday, December 12, 2011

A Cowboy Christmas!

For those of you that have followed my blog recently, you might remember a few other western baby quilts done in the past month.  In about a week, this baby will be boy number 5 for this family.  This is the 3rd quilt I have quilted for him.  One made by his Mom, and one by each of his grandmothers.  I am not sure they all even know there are so many quilts....but my lips are sealed!

This has a fun little 3D bandanna.
Boots, front and back. 
You can hardly see the quilting from the front, but it shows up well on the minky back. 
Finally, I had a space tall enough to use my horse stencil.

Sunday, December 11, 2011

ABC- 123

This was so fun to quilt!
Lots of the fabrics had letters and numbers, so I randomly hid the letters A,B,C and the numbers 1,2,3 in the quilting.
This was my client's first time to machine applique. She did a great job! 
Each of the large applique flowers have pebbles in the centers. 
ABC print on the back.
I love it! 

Thursday, December 8, 2011

Rhyme Time Quilt

So . . . about 6 weeks ago, I got a text from my brother-in-law in Pennsylvania.  He needed a quilt for his brand new niece and would see this family in upper New York at Christmas.  After texting back and forth, I got an idea of what to make and decided on this cute fabric:

Rhyme Time by Annabelle Rose for Wilmington Fabrics.
Mother Goose is here with her entourage. 
 Strategic cutting gives you a whole horizon of nursery rhymes.

Notice "Twinkle, Twinkle Little Star" in the diagonal stripe border.
 "The Old Woman Who Lived in a Shoe" is center stage.
More rhymes printed on the light green. 
Of course, I put Minky on the back. 
Hey, it's an old fashioned "I Spy"quilt with lots of things to discover!

I texed him back today to let him know it is all boxed up along with a couple of boxes of Christmas Candy and will be on it's way tomorrow.
Ho, Ho, Ho!

Wednesday, December 7, 2011

Ultra Suede Quilt

My client made this from 3 yummy shades of ultra suede!
With a loftier batting it is really more like a comforter.
I have use ultra suede for backing, but this was the first time I have quilted ultra suede that has been pieced. It actually worked out very well.
There are also 3 lovely embroidered tapestry blocks.
While I did a simple and open swirl over the quilt, I followed the flowers on these three blocks. 
Wide cotton backing in a mottled rust, looks like old cracked leather. 
What a super gift for her daughter's wedding after Christmas!

Saturday, December 3, 2011

Christmas Candy

Ok, remember the caramel from this post?

Today, I cut it in strips then cut the strips into about 1 inch squares. Dipped them in Guittard "Signature" Milk Chocolate.  I put a link here just in case you wanted to see what it looks like; but, I have never ordered it online, we have a local specialty store that sells the 10# bricks.  I buy one every fall and dip chocolates 2-3 times through Feb.  I have family all over the US to send candy to but chocolate and warm weather is not a good mix, so, I only make this in the fall and winter.

After breaking up the chocolate, I melt it slowly (15-30 sec. at a time) in the microwave.  Melt and stir, melt and stir.  I am not going into all the details about the techniques of tempering chocolate, but am just going to hit a couple of high spots here. However, if you are interested, here is a very informative link: Tempering Chocolate  I have always worked with my 2 quart glass measuring bowl and a microwave.  Professional electric tempering units start at $500--good ones are twice that much.

Drop the caramel into the melted chocolate.
Turn it over 2-3 times to make sure it's all covered and lift it out of the bowl.
Quickly, turn it over and drop it onto waxed paper.  At this point, it only takes a minute or two to harden and set up.
They will lose the shine when the chocolate hardens.
I broke one open and stuck it on a fork so you can see the consistency of the caramel inside the chocolate . . . and since chocolate melts at about body temperature you can see my thumb print, just from picking this up and breaking it.  No wax or stabilizers added to this chocolate.  It's a little harder to use, but the taste is a world apart from grocery store chocolate "coating."
Boxed up and ready for Christmas delivery!
No assembly line look here, each one has it's own little character.  

Saturday, November 26, 2011

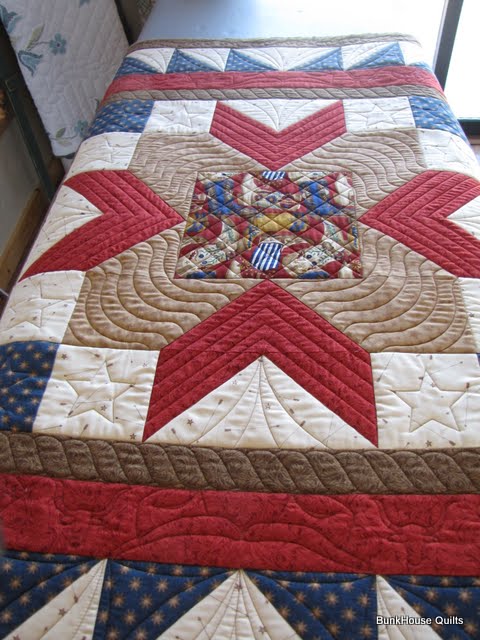
Western Wall Hanging

Slowly but surely, I am making my way through my customer's Christmas quilts.  This is for my client's daughter and her hubby.  It's going to look great in their house.
This center block fabric is printed with boots . . . 
. . . so, I ran with that idea and next to the brown rope border, the red border is quilted full of boots, steers, and hats. 
70/30 permanent press muslin blend on the back along with Quilter's Dream brand "Dream Poly" weighty batting. I have found that this combination wrinkle proofs a wall handing.  It won't sag, wrinkle and it hangs very well.  I have even rolled quilted wall hangings with tissue paper and sent them through the mail. They flip right out of the packaging with little distortion.  A little steam is all they need to hang nicely. 
I also attached a hanging sleeve.

I was not pleased with my last hanging sleeve because you could see the "rod bump" from the front of the quilt.  Here I found a great tutorial for the AQS Quilt show by Bonnie Browning .  This one works much better.  Although it's all hand sewn on the quilt back....ugh.
Like including batteries, it will be already to hang Christmas Day!


Sunday, November 20, 2011

Homemade Caramels

I just wish you all could smell this wonderful aroma in my kitchen tonight!
Three pans of caramel! 
When these are room temperature, I will "ripen" these in the cool back bedroom for a few days/week. 

I have never taken photos of anything I have cooked, but it occurred to me to share this with you when I got to the second batch.

This is it!  A few simple ingredients:
1 cup white corn syrup
1 cup white sugar
1 cup brown sugar
1/2 pound butter
1 can sweetened condensed milk 
I must tell you up front that I have made candy with name brands, house brand, every brand.  I can tell no difference with these particular ingredients, so I always buy the one that is cheapest. When it comes to my dipping chocolate, that's another story and I will get to that in a future post.

On med. high heat, melt the butter first and then tip the pan round and round to coat the sides half way up.  This helps keep the sugars from sticking to the sides of the pan when it starts to boil.  Add all the other ingredients and keep it on med high heat.  If you turn it on high, it cooks to fast and it's hard to keep it from scorching.
Always use a wooden spoon with candy!
Reason: you take a chance of crystallization your candy with a metal spoon.

I learned to make candy with my Mom but when I married, my mother-in-law took me to candy heaven! They learned from their mothers . . . so this wooden spoon theory goes way back.  In today's world the wooden spoon gets a bad rap because it is porous and might harbor bacteria, etc.  If you are interested in the science (how did Granny know this???) of wooden spoon vs. metal spoon you can read a brief explanation here. 

I like one that is flat on the bottom so you get full contact with the bottom of your pan.  I have been known to cut off a rounded spoon to make it flat. I prefer this old relic, which has stirred every batch of candy I have made in the past 30 years. 
My favorite candy pan is a pressure cooker.  It is heavy (thereby evenly heating) and has a sturdy handle.  I bought my daughter a pressure cooker so she can make candy.  They are deep, but not so large so they are hard to handle.  Just right for a batch of candy.

Buy the way, I would not advise you to ever double a candy recipe.

I like to keep my thermometer handy in a glass of hot tap water.  That way, it's warmed up and ready to put into the hot syrup when it starts to boil.  My pastry brush is also in the water-ready to go.
As mentioned earlier, the butter will help to keep the sugar from sticking to the pan, but when the candy starts to bubble, it will splash on the sides. This is when you need to quickly brush the sides of the pan with water to wash down any sugar crystals that may have formed. If you are interested, the Science of sugar goes into a brief but detailed explanation about candy and sugar crystallization.
 
Stir continuously until it reached 230-232 degrees. It will scorch in a heartbeat, so take care to really stir continuously. The flat bottom spoon will help facilitate this.

Now, I live at 5,400 feet, so If you are at sea level, or way up on that mountain top above me, you might have to find a chart and adjust a degree or two one way or the other. If it's a stormy day I might cook it another degree or two depending on the atmospheric pressure.

We all know that water boils at 212 degrees....but that's at sea level. At my house it's already boiling before it gets to 212.

Before you start cooking the candy, spray a 9 x 13 metal pan with cooking spray.  My mother-in-law always used mineral oil. They certainly didn't have things like "Pam" back in the day. I like to buy the butter flavor spray for candy.

Set your 9 x 13 on a baking rack to keep the heat off of your counter top. Pour hot candy.

Do not scrape the pan.

This goes for any candy. You might pick up a sugar crystal from the side of the pan and if it enters the mass of candy, it will set off a chain reaction and sugar the whole batch.

Again, how did granny know all this???
Fear not!  Waste not!  After you pour into your 9 x 13, I always scrape the pan onto an oiled dinner plate.  Here are the scrapings from all three batches poured on top of one another.  This is about the time that the Hubby arrives with a knife to do the quality testing.


Stay tuned! All the caramel is going to be cut in squares and dipped in chocolate next week.

LinkWithin

Related Posts Plugin for WordPress, Blogger...